A while back, I wrote a blog post walking through the components of a default AWS Virtual Private Cloud (VPC). Now that I am at Rubrik and have more freedom to continue, I will go through how to create a custom VPC. If you are new to AWS and have not read my previous posts on the AWS global infrastructure and on the default AWS VPC, I recommend doing so since they serve as the foundations for what we will be discussing in this blog post.
So why would we even want to create a custom VPC? While it’s certainly possible to host production workloads in a default VPC with “out-of-the-box” settings, AWS recommends that users customize their VPCs as their environments grow more complex. For example, a default VPC assumes all EC2 instances will live in a single public subnet with access to internet traffic which may not meet a company’s security stance.
While it is possible to simply modify the default VPC, we will actually create a custom VPC “from scratch” using the AWS console. We will create and customize the same components that we discussed in my default VPC blog post since they serve as the building blocks for any VPC:
- VPC CIDR Block
- Subnet
- Gateways
- Route Table
- Network Access Control Lists (ACLs)
- Security Group
The place to begin is the VPC Dashboard in our AWS Console where you can get an overall view of what is in a VPC for a given Region. Note that the basic components I mentioned earlier will already be provisioned as part of the default VPC that is assigned to every AWS account for every region. AWS helpfully provides wizards that simplifies the custom VPC creation process but in this post, we will manually walk through the process.
VPC and VPC CIDR Block
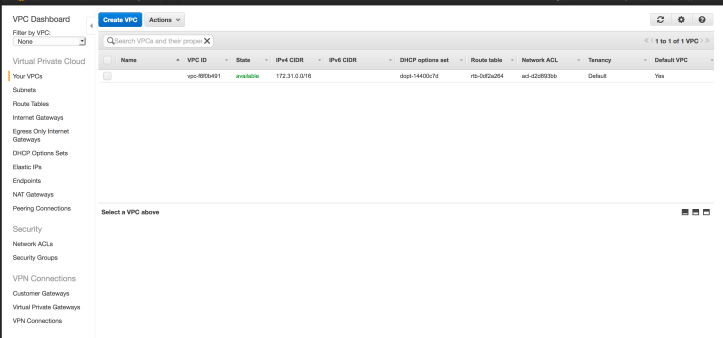
After choosing a Region, select “Your VPCs” in the left sidebar and the dashboard will display all VPCs associated with your account in that Region, including the default VPC. To create a new VPC, we click on the “Create VPC” button which will launch the Create VPC screen.

We will name the VPC and choose a sufficient size CIDR block from the IP address ranges defined by RFC 1918. In this case, I am creating my Cloud Architect Musings VPC in the US East (Ohio) Region and assigning it a 172.16.0.0/16 CIDR block which will provide up to 65,536 private IPv4 addresses.

Logically, this becomes our canvas for creating an AWS network environment:

Subnets
Next, we are going to create multiple subnets in our VPC. A common use case is to create separate public and private subnets. The public subnets would be used to host EC2 instances, like web servers, that would accept inbound requests from the Internet. The private subnets would host instances, like database servers, that we may want to restrict access to from the Internet.
To see only the Cloud Architect Musings VPC, I can go the drop down menu on the upper left of my VPC dashboard and choose to filter by specific VPCs.

We go to the “Subnets” screen to create our subnets. Recall that a subnet is always associated with a single Availability Zone and cannot span multiple AZs. However, an AZ can host multiple subnets. Click on the “Create Subnet” button to launch the Create Subnet Screen.

We’ll start by creating our first public subnet and naming it “Public Subnet 1.” Since we are only viewing the Cloud Architect Musings VPC, that will be selected by default. Under the “Availability Zone” drop down menu, we will see all the AZs that are available in our US-East (Ohio) Region. Note that if we were to choose “No Preference,” AWS would always map any subnet we create to the lowest numbered AZ which in this case will be “us-east-2a.” Typically, we would want to choose a specific AZ.

In this case, we will map our first subnet to us-east-2a. We will assign this subnet a 172.16.0.0/20 CIDR block which yields 4091 possible IP addresses, minus the 5 addresses that AWS always reserves.

We will repeat the above steps to create our first private subnet which will also be mapped to us-east-2a. This subnet will be assigned a 172.16.16.0/20 CIDR block which also yields 4091 possible IP addresses, minus the 5 addresses that AWS always reserves.

One very important thing to notice is that when we create our own subnets, they will be configured to NOT auto-assign public IP addresses. This means EC2 instances created in either subnet will not be reachable from the Internet directly since they will only have private IP addresses assigned. W can always override this during the EC2 instance launch process.

For our purposes, we will assume all EC2 instances launched into our public subnets should have Public IP addresses assigned to them. From the “Subnet” screen we choose Public Subnet 1 and in the “Subnet Actions” drop down menu, we choose “Modify auto-assign IP settings.”

We check the box to enable auto-assign so that all new EC2 instances assigned to this subnet will receive a public IP address by default.

To ensure redundancy, we will create “Public Subnet 2” and “Private Subnet 2” in the us-east-2b Availability Zone and assign each their own /20 CIDR block. We will also configure Public Subnet 2 to auto-assign public IP addresses.

Logically, the Cloud Architect Musings VPC looks like this:

Note that we are not showing the us-east-2c Availability Zone although we could easily create subnets that map to that AZ as well.
When we launch an EC2 instance, we’ll need to specify the Cloud Architect Musings VPC and in which specific subnet that instance should be created.

This new instance will receive a private IP address from the pool of addresses associated with that subnet and also a private DNS hostname. In our public subnets, an instance will also receive a public IP address from the pool of addresses owned by AWS along with a public DNS hostname.

Instances launched inside our private subnets will only have a private IP address assigned by default and will only be reachable from another host in the VPC or from a network that has VPN or Direct Connect access to the VPN.
Gateways
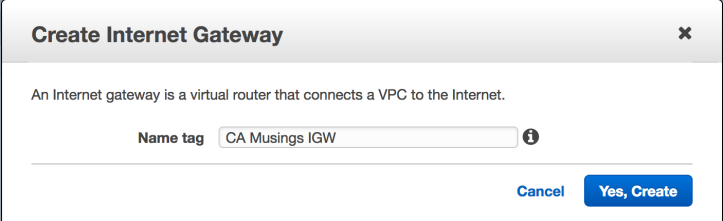
Currently, instances launched in our VPC will not be able to communicate outside the VPC, even if they have a public IP address because they don’t have access to any gateways to the Internet. For communication with the Internet, we need to attach our Cloud Architect Musings VPC to an internet gateway by going to the “Internet Gateways” screen and click on the “Create Internet Gateway” button. We’ll name our internet gateway “CA Musings IGW.”
At this point, it will look like no internet gateway has been created. That’s because we are still using the dashboard filter to only see objects related to this custom VPC and we have not yet attached this new gateway to our VPC. If we go to the “Filter by VPC” drop-down menu on the upper left of the dashboard and choose to filter by none, we will then see both our default internet gateway and the detached CA Musings IGW internet gateway.

Next, we click on the check box next to our new gateway and choose the “Attach to VPC” button. Since an internet gateway can only be attached to one VPC at a time and the default internet gateway is already attached to the default VPC, only the Cloud Architect Musings VPC will be available for attachment.

We now have an internet gateway can be used to provide Internet access to our VPC.
Instances in the private subnets that need to connect to the Internet or other AWS services but not accept connections initiated from the Internet can use a network address translation (NAT) gateway. This is a AWS managed entity that will sit in a public subnet and act as a proxy for instances sitting in our private subnets. A use case may be database servers in a private subnet that should only be accessed by web or application servers in a public subnet but need to be able to pull down updates from the Internet.
We create a NAT gateway by going to the NAT Gateways screen and clicking on the “Create a NAT Gateway” button. We need to create the NAT gateway in one of the public subnets in our Cloud Architect Musings VPC since the NAT Gateway needs a route out to the Internet through the internet gateway. In this case, we will choose Public Subnet 1.

After choosing a subnet, we need to allocate an Elastic IP to the NAT gateway. The Elastic IP is a static public IP that will allow the NAT gateway to proxy traffic between instances in the private subnets to the Internet. Since we did not create Elastic IPs beforehand, we will do so here.

In the next screen, we are given the option of viewing the gateway or editing a route table. Since, we’ll be walking through configuring route tables shortly, we’ll just choose to view the gateway.

We’ve now added an internet gateway service to the border of our custom VPC and a NAT gateway to Public Subnet 1:

Note that if we want to be able to access our instances hosted in any subnet, through a private connection, we would need to create a virtual private gateway and pair it with a customer gateway. I am going to save that for a future blog post.
Route Table
Now that we have an internet gateway and a NAT gateway, we need to tell our instances how to access them. This is done by creating routes tables in the Cloud Architect Musings VPC’s implicit router. One route table will have a route that expresses a path between our public subnets to our internet gateway. Another route table will have a route that expresses a path between our private subnets to our NAT gateway. The public subnets are “public” by virtue of the fact that they provide their instances a route to the internet gateway. The private subnets will not provide instances a route to the internet gateway but to the NAT gateway.
We’ll start with creating a route table for our public subnets by going to the “Route Tables” screen in our dashboard. Since an implicit router is created with every VPC, you will see that one has already been created for the Cloud Architect Musings VPC.

To create a new route table, click on the “Create Route Table” button. We will create a new route table called “Public.” You can choose which VPC’s router this route table should be attached to so we’ll choose the Cloud Architect Musings VPC.

If you recall, every route table contains a default local route to facilitate communication between instances in the same VPC, even across subnets. What we need to do next is to do add a route to the CA Musings IGW gateway. While in the “Routes” tab, click on the “Edit” button and add a route which will tell instances using that route they can access any destination using the internet gateway as the target.

To specify that our public subnets use this new route table, we need to explicitly associate them by going to the “Subnet Associations” tab and clicking the “Edit” button. Select the two public subnets and hit “Save” to confirm the association.

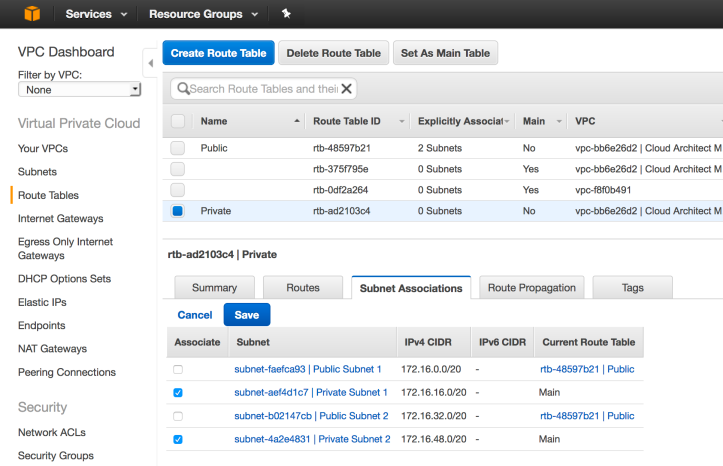
Next, we need to create a route table to give instances in our private subnets a route to our new NAT gateway. Go back to the “Routes Table” screen and create a new route tabled called “Private.” Edit the route table and add a new route which will tell instances using that route they can access any destination using the NAT gateway as the target.

Then we need to explicitly associate our private subnets to the new NAT gateway.
Logically, the “Cloud Architect Musings” VPC now looks like this:

Note that the dotted lines represent the routes from the private subnets to the NAT gateway. To simplify the diagram, I have not connected them graphically through the VPC router although all traffic in and out of all subnets do in fact go through the router.
Now that we have our custom VPC networking wired up, in the next blog post I will walk through configuring security for our new VPC.
