If you haven’t yet, I recommend reading the other posts in this series before proceeding.
- AWS 101: Learning About Regions and Availability Zones
- AWS 202: Learning About Default VPC
- AWS 301: Creating A Custom Virtual Private Cloud (VPC) – Networking
In my previous blog post, I started to walk us through the process of creating a custom Virtual Private Cloud (VPC). Now that we have our VPC networking configured, it’s time to secure our VPC. The native tools for doing this are Network Access Control List (ACL) and Security Groups. I explained what both are in my default VPC post.
Network ACLs
The two primary things to recall about Network ACL are:
- They are applied at the subnet level so any EC2 instances within that subnet are protected implicitly by a Network ACL
- They are stateless which means inbound and outbound rules have to be set explicitly and are evaluated separately.
To see only the Cloud Architect Musings VPC, we go to the “Filter by VPC” drop-down menu in the VPC dashboard and choose to filter to only see the Cloud Architect Musings VPC. Going to the “Network ACLs” section, you will see the default Network ACL which allows all inbound and outbound traffic through any port.

Instead of customizing the default Network ACL, we are going to create a new one by clicking on the “Create Network ACL” button. We’ll first create a new “Public” Network ACL and confirm that it is assigned to the Cloud Architect Musings VPC.

Then we’ll repeat and create a new “Private” Network ACL.

Note that unlike the default Network ACL, our new Network ACLs deny all access at creation. We’ll start by creating new inbound rules for our Public Network ACL using the “Add another rule” button in the “Inbound Rules” screen. You’ll be given the option of selecting a rule # and a rule type, along with other options.

We will create the following inbound rules for our Public Network ACL.


Next we have to create the outbound rules using the “Add another rule” button in the “Outbound Rules” screen. We will create the following outbound rules for our Public Network ACL.


Next we need to associate our Public Network ACL with our public subnets using the “Edit” button on our “Subnet Associations Screen.


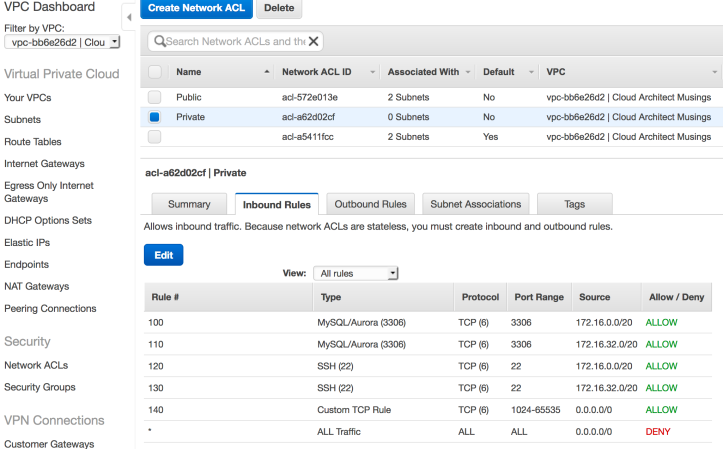
We’ll follow a similar process for creating inbound and outbound rules for our Private Network ACL and associating it with our private subnets. We will create the following inbound rules for our Private Network ACL.

We will then create the following outbound rules for our Private Network ACL.


Finally, we will associate our new Private Cloud ACL to our private subnets.


Security Groups
Moving on, we want to configure our security groups which are firewalls that are applied at the instance level. The two primary things to recall about Security Groups are:
- Only instances explicitly associated with a security group will be subject to its rules
- We can specify rules to allow network traffic but cannot create rules to deny specific types of traffic. In essence, all traffic is denied except for traffic we explicitly allow.
- Security groups are stateful so if we create a rule to allow a certain type of traffic in, then outbound traffic in response is also allowed even if there is no explicit outbound rule to allow such traffic.
Use the “Filter by VPC” menu to display only the default security group for our Cloud Architect Musings VPC. For the sake of simplicity, we will only create two new security groups – web-servers and db-servers.
First, we will use the “Create Security Group” button to create the web-servers security group.

Then we will repeat the process to create the db-servers security groups.

Next, we will create the following inbound rules for our web-servers security group using the “Edit” button for the “Inbound Rules” screen.


Then we need to create the outbound rules for our web-servers security group. We will be editing the exiting rule.

Note that when we assign the “Destination” we will be shown a list of available security groups.

We will go ahead and finish creating the outbound rules.

We will move on to create the inbound rules for the db-servers security group.


We will finish up by creating the outbound rules for the db-servers security group.


You may notice that there is a great deal of overlap between Network ACL and Security Groups. For that reason, many users choose to only create and to modify Security Groups while using the unmodified default Network ACLs.
Wrapping Up
To summarize, we’ve done the following over the course of these two blog posts:
- Created a custom VPC called “Cloud Architect Musings”
- Created two public and two private subnets across two Availability Zones in the same Region
- Created an internet gateway to facilitate access to the Internet
- Created a NAT gateway to facilitate outbound only access to the Internet
- Created a network route from our public subnets to the internet gateway
- Created a network route from our private subnets to the NAT gateway
- Created a Network ACL for our public subnets
- Created a Network ACL for our private subnets
- Created a “web-servers” security group
- Created a “db-servers” security group
To make use of our new custom VPC, we could simply do the following:
- Launch EC2 instances for use as web servers with the following configuration:
- Network: Cloud Architect Musings VPC
- Subnet: Public Subnet 1 or Public Subnet 2 (Spread multiple web instances across both subnets/Availability Zones or resiliency)
- Security Group: web-servers
- Launch EC2 instances for use as database servers with the following configuration:
- Network: Cloud Architect Musings VPC
- Subnet: Private Subnet 1 or Private Subnet 2
- Security Group: db-servers
- Alternatively, you can launch Relational Database (RDS) instances with the following configuration:
- Network: Cloud Architect Musings VPC
- DB Subnet: Private Subnet 1 and Private Subnet 2
- Security Group: db-servers
It is out of scope for this blog post but we would otherwise deploy both internal and external Elastic Load Balancing (ELB) instances. The external ELB instance would be used to balance requests across our web servers spread across multiple Availability Zones. The internal ELB instance would be used to balance requests across our database servers or RDS instances and their read replicas across multiple Availability Zones.

Note that the diagram above shows direct network connections between web servers and database instances. However, all network communication between subnets have to go through the VPC router, relevant Network ACLs and relevant Security Groups.
Hope this series has been helpful. All comments and feedback are welcomed.

Hi thanks for putting together such clear information. Spotted a typo, “Next we have to create the outbound rules using the “Add another rule” button in the “Inbound Rules” screen. We will create the following outbound rules for our Public Network ACL”; Needs changing to “outbound rules” screen, cheers
Thanks for catching the typo and thank you for reading.